首先,本指南適用於全新安裝。

什麼有效:
幾乎所有東西,除了......
什麼不起作用/免責聲明:
內部聲卡:尚未驅動
問題:
SSD的啟動過程有點慢?(大約1分鐘),我正在調查。
BIOS settings
- 使用“磁盤工具”清除安裝磁盤,理想情況下使用APFS
- 在新格式化的磁盤上開始安裝
- 安裝過程將重啟hackintosh幾次。確保從(安裝磁盤)選擇從安裝macOS啟動,而不是從USB!
- 安裝完成後,磁盤有3個啟動選項:FileVault Preboot,macOS Installer Preboot和Boot MacOS - 選擇後者Boot macOS
Post Installation:
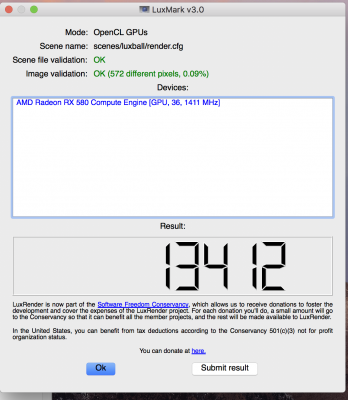
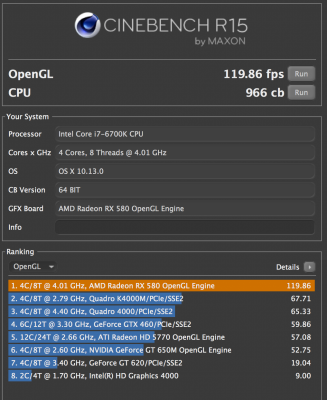
Nothing!如上所述,RX 580和5K開箱即用。
clover-kext-Z170X-UD3.zip
- 技嘉GA-Z170X-UD3
- 英特爾i6700k Skylake
- AMD RX 580(這只是一款顛簸的RX480),具體供應商/型號:Sapphire RX 580 8G Nitro
- 三星1TB Pro 840 SSD
- (32 GB RAM)
什麼有效:
幾乎所有東西,除了......
什麼不起作用/免責聲明:
內部聲卡:尚未驅動
問題:
SSD的啟動過程有點慢?(大約1分鐘),我正在調查。
BIOS settings
- In BIOS Features
- Fast Boot: Disabled
- Windows 8/10 Fatures: Windows 8/10
- CSM Support: Disabled
- Network Stack: Disabled
- In Peripherals:
- Intel Platform Trust Technology: Disabled
- Initial Display Output: PCIe 1 Slot (Or whatever slot your GFX is in)
- Legacy USB Support: Enabled
- XHCI Hand-off: Enabled
- Port 60/64 Emulation: Disabled
- In Super IO Configuration:
- Serial Port 1: Disabled
- In Chipset:
- Internal Graphics: Disabled
- Audio Controller: Enabled
- PCH LAN Controller: Enabled
- IOAPIC 24-119 Entries: Enabled
- 在Mac / Hackintosh上從Mac App Store下載High Sierra
- 使用DiskmakerX創建USB安裝棒
- 下載幸運草
- 使用以下選項在USB驅動器(!)上安裝Clover :
- UEFI主板的安裝
- Bootloader:沒有更新
- CLOVER EFI 64 SATA
- Drivers64UEFI:CSM,Fat,EmuVariable,OsxAptioFix2,OsxAptioFix
- 下載Clover Configurator,打開它,轉到Mount EFI,打開分區並將文件從clover-kext-zip複製到文件夾/ EFI / EFI / CLOVER / kexts / Other
- 從這篇文章下載apfs.efi並複製到/ EFI / EFI / CLOVER / drivers64UEFI
- 按主頁按鈕並加載EFI - EFI - CLOVER - config.plist。勾選選項:
- ACPI: FixShutdown,FixDisplay
- 啟動: dart = 0,nv_disable = 1
- 內核和Kext補丁
- 名稱: AppleUSBXHCIPCI,查找: 837d8c10,替換: 837d8c1b,評論:更改USB端口限制和USB3支持
- RT變量: Bootconfig 0x28,CsrActiveConfig 0x67(這會完全禁用CSR)
- SMBios:單擊大問號下的箭頭按鈕,選擇MacPro6,1,然後單擊Generate Serial Button幾次。注意:我得到一個帶有iMac-SMBIOS的黑屏。配備AMD RX580和5K的MacPro6,1開箱即用。
- 保存配置並重新啟動到USB磁盤
- 使用“磁盤工具”清除安裝磁盤,理想情況下使用APFS
- 在新格式化的磁盤上開始安裝
- 安裝過程將重啟hackintosh幾次。確保從(安裝磁盤)選擇從安裝macOS啟動,而不是從USB!
- 安裝完成後,磁盤有3個啟動選項:FileVault Preboot,macOS Installer Preboot和Boot MacOS - 選擇後者Boot macOS
Post Installation:
Nothing!如上所述,RX 580和5K開箱即用。
clover-kext-Z170X-UD3.zip
留言
張貼留言